(My deepest thanks to James Jones who provided the basic information to me that got me started on rebuilding K batteries, and to Gerhard Sehne, John Mourikis and Karl Bortscheller who collaborated in producing the great captioned photograph montage of the red K battery used here as an overview guide of what it looks like inside.)
Rebuilding a K battery to power certain of your 110 cameras that require them (most notably Kodak cameras and a number of Minoltas, to name a few) is really not a hard job at all. I won't lie and say its "fun", but neither is it distasteful or complex. The hardest and longest (and potentially dangerous, if you're not careful) part is separating the plastic outer casing on a dead K battery. Once that's done, the actual rebuilding takes about 10 minutes or less with a little practice, and from that point on you can reuse the battery over and over for years, rebuilding it each time in under ten minutes with a little patience and some very simple tools. Even if you use the more expensive silver-oxide button cell batteries to
rebuild with, at $3.00 each for 3 of them at Radio Shack, you can rebuild the battery for just $9.00, a much cheaper alternative than the $20.00 or more some places want for them if you could find them. Using the cheaper, alkaline button
cells bring the price down to a mere $6.00 per battery, which is nothing nowadays...so there's a lot of money to be saved in rebuilding a K battery, as well as the joy of knowing that you can power your beloved camera for years this way, even though new K batteries haven't been made for several years now.
The Overview:
Essentially speaking, you are going to carefully separate the plastic casing of the dead K battery into two halves.  Having done this, you will clearly see the internal construction of the battery: 3 large, 1.5 volt button cell batteries wired up together to produce a combined total of 4.5 volts DC when new. This is done by soldering them together with what looks like little aluminum strips, soldered to the positive (+) side of one battery at one end, and then to the negative (-) side of the next battery at the other. You will either carefully remove these aluminum connecting strips by unsoldering them, or, as I did, carefully pulling them off with a pair of needle nose pliers. You may discard the batteries, but be certain to save the silver metal disk which serves as an end cap for the front, sloping end of the original K battery.
Using very fine 24 gauge speaker wire twisted into 4 strands, you will solder three A76 or S76 button cell batteries together in the same manner as the original batteries were. Placing them back in the casing and checking them with a voltage meter to ensure you have them wired properly, you'll then tape the two halves of the plastic casing together. The detailed description below gives you additional important information, so be certain to read it through
carefully and study the photographs provided before you start: it will make a big difference in the success of your project.
The Tools Needed:
I am not necessarily stating that my way of rebuilding K batteries is the "right" way, or even the only way...but it works quickly and effectively for me. If you wish to duplicate what I do, these are the tools and
materials you will need to gather together:
1. A soldering iron of at least 30 watts. I prefer the pencil type of soldering iron for this type of work: while the pistol type will work just as well, I find the pencil type much easier to direct and control in my hand. If you don't have one or can't borrow one, Radio Shack has a perfectly acceptable range of soldering irons in the $6.00 to $15.00 range,
making them rather easily affordable.
2. While any type of standard solder will do, I highly recommend spending a dollar at Radio Shack and purchasing a small plastic pouch of "low heat solder tape", Radio Shack part number 64-010. This stuff is great for this project: simply cut a small patch out, lay it on the battery side you're working on, place your wire on top of it, and then press down on the wire with the heated soldering iron until the tape melts in a few seconds. This makes the task much easier to control, and much faster.
3. About 2 inches of 24 gauge speaker wire...Radio Shack has a 50' roll of it for about $3.00. You absolutely must have some very fine gauge speaker wire, which is generally 8 fine wires twisted together to form a single strand. You will use this to create a 4 strand piece for actually soldering with - I quickly found out that any larger gauge wire creates a
package too large to stuff back into the plastic casing when I was done.
4. A small strip of Scotch tape to tape the two halves of the casing back together when you're finished.
5. A small, 1/2" by 1' strip of black electrical tape for insulating the batteries after you solder the together to
prevent short circuiting. A 1" strip gives you plenty for 3 batteries. Radio Shack also sells a roll of this very inexpensively (remember: Radio Shack is your friend...).
6. A pair of slip joint pliers: this is vital for gently but firmly holding the K battery casing while you cut it open, to keep from slicing your fingers off...I can't emphasize this enough. Trying to do this the first time with a box cutter, I gave myself a very, very nasty gash in the thumb. I learned quickly...
7. A box cutter or similar razor blade type tool
(X-acto knife...Radio Shack also has a small starter set for about $3 - $5.00)
or else a very, very sharp knife to cut the case open with….or a hacksaw for an
easier, safer way of doing this: see description further on.
8. Scissors to cut the tape with.
9. Magnifying glass on a bendable stand, or even better, a cheap plastic pair of magnifying reading glasses sold at book stores. A 2.5 dioptre power works very well for this. Unless you have really great eyes, you are going to get a severe headache resulting from eyestrain as you attempt to focus on very fine work, very close to your face. These cheap reading glasses were absolutely essential for my 46 year old eyes: I literally could not have done this project without them.
10. Three A76 size (alkaline) 1.5 volt button cell batteries, or three S76 size (silver-oxide) 1.35 or 1.5 volt button cell batteries. Others have recommended V386 button cell batteries, and these do work quite well, however, I find them a bit more difficult to locate, whereas the 76 series is pretty commonly available at Radio Shack or any good photo
store or photo department of a drug store or convenience store. The 76 series is a bit smaller physically than the original batteries in the K case, but this makes it easy to remount them inside, and they work beautifully.
11. A very small pair of Vice-Grips type locking pliers; even a large one will do, the small ones just happened to be what I had handy. By placing the battery into the Vice-Grips, you can steady it easily for fine soldering, keeping it from moving about all over the table. Just as important, you can avoid handling the battery while soldering and immediately
thereafter, since the soldering iron can very quickly heat the little battery up to the point where you can be burned by it.
That's it - most of these things you probably already have around the house, or can easily borrow from a friend.
The Hard Part: Opening the Casing
The only really tedious portion of this project is carefully opening the casing; it takes patience, about 10 - 20 minutes depending on you, and a wee bit of elbow grease. Use the slip joint pliers to grasp the battery gently but firmly about the middle: you don't want it to slip, but neither do you want to inadvertently crush it.
Using your box cutter blade, score the battery lengthwise around the entire casing, using the edge of the metal contact strip band in the middle as a guide to where the centre line is. You'll do your heaviest "sawing" at the rectangular end (back end) of the battery casing as this is where most of the plastic is. If you have sensitive fingers, you can often detect the subtle difference in resistance on the blade as you begin to scrape across the tops of the battery inside. You'll have to cut all the way through, all the way around, and then slip a fingernail into an end to gently pry the two halves away from each other.
My thanks to Fred of photobatteries.com for this much easier, much safer method of doing the same thing: gripping the battery in a vise or a pair of Vise Grip pliers, use a hacksaw to saw down the centre seam of the ridged, back end of the battery. At that point, you should be able to insert a screwdriver into the groove, give it a smart half twist, and most often the battery will neatly split the rest of the way down the length of the seams.
The metal contact strip band does NOT need to come off the plastic casing, and indeed, you should not remove it - it will make things far easier for you later on.
You're In!
Take a moment to study the insides while you have them there:
Beginning with the sloping front end of the battery, you'll see a flat metal disk soldered to the battery directly underneath it – but here is an important note: in the photo montage of a red K battery at the beginning of this article, I see no trace of this flat metal disk. Further, in actually opening up a red coloured K battery, I found no disk inside either, leading me to believe that the red batteries, perhaps being made by a different manufacturer, dispensed with the disk because they used a slightly larger battery whose actual casing projects enough to make good contact with the electrical contacts in the camera. If rebuilding a red battery, you may have to go and find a suitable flat, thin washer to act as an impromptu shim in order to successfully rebuild red batteries – since the other coloured batteries all seem to have the requisite flat metal disk, this should not be a problem with them. On the other hand, a fellow subminiature camera enthusiast, Larry Hester, also did some experimenting and noted two other things which he kindly shared with me: one, Burgess apparently made a cream coloured K battery that, like the red ones, is also sans flat disk; two, he found that a 625 series button cell battery is almost identical to the original batteries, and fits perfectly in the case as a front battery, maintaining good contact with the electrical contacts inside the camera. I suspect that you could easily use a 625 for the front battery and two A76's for the rear batteries and have it all work quite well. The flat disk that is soldered directly to the first battery is the portion that actually connects with the copper contacts inside your camera. If you gently pull this and the connected batteries partly out of the casing, you'll clearly see how the batteries are wired up to produce the 4.5 volts needed to power the camera: + to - from one battery to another. 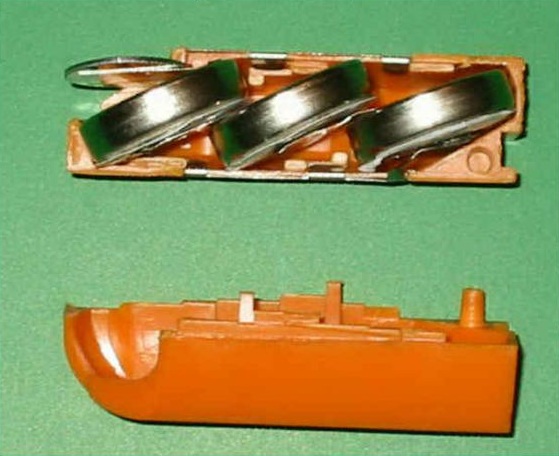 The end cap is soldered to the + side of the first battery; the - of that first battery is soldered to the + side of the 2nd battery, etc., until you reach the - of the 3rd and last battery: this is soldered to the metal contact band that runs around the outer battery casing, down at the bottom side of the plastic battery shell.
Begin by removing the end cap (metal disk) from the first battery; you may either unsolder this by holding the tip of your soldering iron firmly to the battery top where the aluminum contact strip joins it until it heats up and the solder softens, and then pull it away. I chose to carefully grip the metal disk with a pair of needle nose pliers and gently pull until it snapped off. Save this metal disk as you must have it later to make the rebuilt battery work.
Now gently unsolder or pull off the metal strips to disconnect the batteries from each other. You may throw the strips away as they will not be needed again; indeed, if you pull them off, you will find that they are not very useable afterward.
Be very careful with the last aluminum strip that connects the - side of the last battery to the metal band that encircles the plastic battery shell: you want to have as much of that aluminum strip as you can get still attached to the middle band when reattaching the new battery set.
Once you pull all the batteries out, turn them over and look at the bottom, or - sides of them. You'll notice a circular, plastic, self-adhesive sticker on the bottom side. If you pull these off, you'll see that they were actually covering the plastic band that separates the metal - side of the battery from the outer + positive side. This is important to understand: the entire outer casing of a button cell battery is the + contact "post" for the entire battery - this is the side that is usually stamped with the battery size, voltage and a "+" symbol, what many people consider to be the "top" of the battery. The inner "button" on the underside of the battery is actually the - contact, what many people usually consider the "bottom" of the battery; it is traditionally and normal unmarked.
Obviously, if these two sides ever came in direct physical contact with each other, they would "short out" the battery, causing it to over heat and possibly explode. The manufacturers separate these two sides with a
plastic inner insulating band to guard against this. The peel off adhesive circles are an added insulating layer that manufacturers of K batteries included to ensure that the aluminum strips that connected the individual button cells didn't inadvertently come in contact with both the + and - sides of a battery at the same time, causing a short circuit. You'll use the small bit of electrical tape, (or Scotch tape if you don't have electrical tape - the electrical tape is really better, though) for the same purpose later on as you assemble the new battery.
Putting It Together:
You're going to begin assembling the batteries together working from the last battery (3rd battery, on the back end of the plastic casing) working forward to the first battery where the flat disk will be eventually mounted. Plug in your soldering iron and let it warm up for a good 5 - 10 minutes so it reaches maximum operating temperature.
Strip the insulation off a one or two inch piece of 24 gauge speaker wire. Carefully separate the 8 fine strands out. Take 3 or 4 or them, no more, twist them tightly together, and cut them to a size of approximately half an inch or just a tiny bit more (more is better, if in doubt: you can always trim away any excess).
Mount a battery in the Vise-Grips, negative side facing up. Trim off a tiny square of solder tape measuring approximately 1/8th of an inch in length. Place this in the centre of the button cell's - side. Place the end of your newly created fine wire on top of this square of solder tape and press the point of your soldering iron down firmly
onto it. You may want to angle the tip of the iron a wee bit so that the tip somewhat contacts both the wire and the solder tape. If you look carefully, within a few seconds or so you should see the tape suddenly melt and liquefy - keep your wire in place steadily and remove the soldering iron. 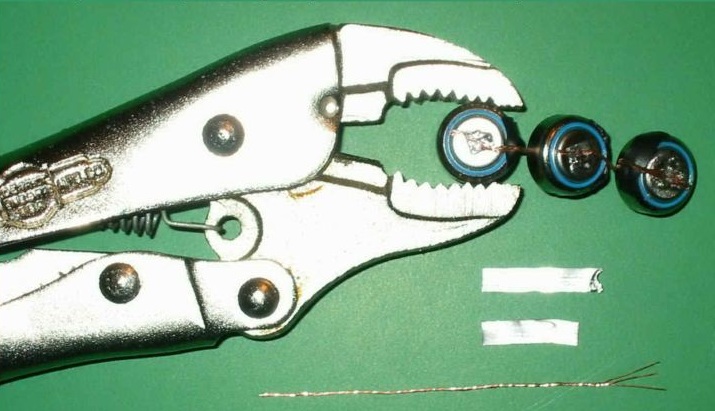 Blow on the connection for a few seconds to get it cool while the solder re-solidifies. Carefully let go of the wire and set the battery aside for a minute or two to cool (bear in mind at this point the battery is hot enough to burn you if you attempt to handle it directly). Make certain to examine the underside of the battery carefully: the wire should NOT be touching across the plastic insulating circle onto the outer, + casing. If it is, gently bend it up enough to keep it off the casing.
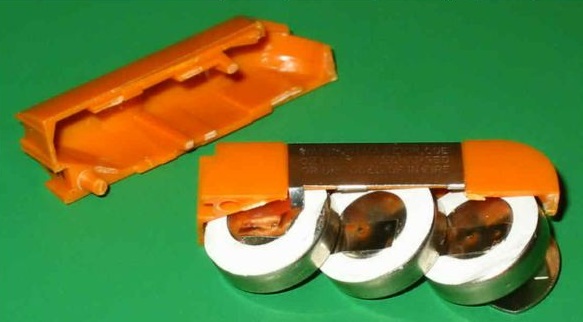
Now cut a small strip of electrical or Scotch tape to a length of approximately 1/2" inch, and cut it in half wide-wise (this assumes you're using standard 3/4" width Scotch tape as commonly found in offices - you cut the wide in half). You'll use this to insulate the battery you just soldered the negative wire to. Wrap this around the outer rim of the battery, allowing the excess to come up over the top of the underside (- side), and press down so that it covers the circular plastic insulating section of the battery directly under the wire - you've now protected the battery from inadvertent short circuiting. You can clearly see this in the photograph showing the final assembly of the three new batteries already soldered together.
While waiting, fashion a 4 strand length of wire approximately 2" in length (more, if you're in doubt). This is the main wire that will connect all three batteries; you'll trim off the excess at the end. Take the battery you just soldered a wire to and place it back in the Vise-Grips, this time with the positive (+) side facing up. Turn it so that the first wire is oriented pointing to the right: the main wire you are now going to solder in place should be lined up pointing the same way, on the same plane as the first wire.
Using the same technique described above, place a bit of solder tape in the centre of the battery surface, place the end of your wire on that, and press down firmly with your soldering iron until the tape melts; remove immediately and blow on it to cool the joint and allow it to solidify. Set the battery aside for a minute or three to allow it to cool down.
Position the next battery in place in the Vise-Grips, - side facing up; placing the battery you just soldered the long wire to close enough to almost touch the new battery (use the photo as a guide), solder the long wire in place into the centre of the negative side of the second battery, using the same technique described above. Again, ensure that the wire does not come in contact across the - and + sides of this batter by placing another bit of tape over the plastic insulator of the second battery in the same manner as described previously. Trim the excess wire off as closely as possible to the soldered joint, making certain that nothing of the little stub that remains will short out across the + and - sides.
Doing the third, and last battery, should be a breeze by now, as you'll use the same procedure as previously. First begin by soldering the new piece of wire to the center of the + side of the second battery (the one you just finished soldering a minute earlier). Now place the third and last battery into the Vise-Grips and solder the other end of this same wire to the centre of the - side of this battery; once again, use a bit of tape to insulate the battery, and trim any excess off as close to the solder joint as possible (allowing the battery to cool for a minute or three first).
You should now have three batteries all wired up, positive to negative sides connected, all in a short little strip, as close together as possible without actually touching. It's time to assemble them back into the plastic casing.
Set the plastic casing on the table with the sloping front side pointed toward the left; looking at the bottom inside of the shell, near where the back begins to angle up, you should see the contact coming off the metal middle band that surrounds the outside shell. This is the same contact that was originally attached to the negative side of the third and last battery when you first opened the case up.
Align your newly joined batteries so that the one battery you first put together, the one with a short length of wire on the negative side as well as a longer one on the top, positive side connecting to the second battery, is facing toward the right...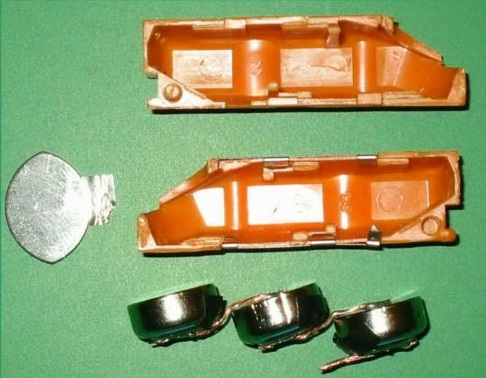 that short wire on the bottom, negative side will actually go under this remaining contact left from the middle metal band, and that strip will be gently bent down and over that wire to make good contact
with it. The tape you already put on the edge of that battery should prevent this negative wire from shorting out against the positive side of this battery case.
that short wire on the bottom, negative side will actually go under this remaining contact left from the middle metal band, and that strip will be gently bent down and over that wire to make good contact
with it. The tape you already put on the edge of that battery should prevent this negative wire from shorting out against the positive side of this battery case.
Angle the last battery into position in the plastic case, so the battery sits at an approximate 45 degree angle (little plastic ridges will help line the three batteries up properly). The remaining two batteries should easily go into proper place directly in front of it, also angled at about 45 degrees. When doing this, you'll now see why you wanted the batteries to be wired as closely together as possible: you don't have a lot of excess room left inside that case for extra wire.
It is very important that the metal disk be fitted into the slot at the front so that it properly covers the front battery. However, and this is the trick that means the difference between success and failure, you will need to wedge a small bit of crumpled up aluminum foil, or perhaps a bit of 4 stranded wire folded over once or twice, into place between the disk and the upper surface of the front battery. Think of it as a sort of spring loaded shim to take up the slack, ensuring solid contact between the upper surface of the battery and the disk, and forcing the disk firmly up to the top of the sloping front side. You'll see if you've done this correctly when you fit the other half of the plastic casing back into place.
Put the second half of the plastic casing in place, holding it firmly together with your fingers. Look at the disk at the front end: if it is not firmly all the way at the very top of the front end (if it appears to be somewhat recessed, or sunken down in the case), it will not make proper contact with the electrical contacts in your camera. It took me two tries before I realized why it was the battery didn't seem to work in the camera: being sunken in barely a millimeter, it wasn’t make solid contact with the copper electrical contacts deep inside the camera. Once I placed a small conducting wedge made of aluminum foil into position between the metal disk and the battery, it worked perfectly.
Cut 1 1/2" length of Scotch tape, and cut it in half lengthwise. Wrap this securely all the way around the back end of the battery while gently pinching the case halves together to secure the back end. Take the remaining bit of tape, and run that around the front rim of the battery casing, trimming off the excess so that it doesn't cover the metal contact band. Before putting it into your camera, it would be wise to do a final check with a multi-meter to determine that you are actually getting a good 4.5 volts out of the battery...if you're not, you may have assembled it incorrectly, or you may not be getting good contact from the negative wire in the last battery, or contact with the flat disk on the front battery. Note that with the silver-oxide batteries that I used, I measured 4.7 volts, but this is because they are brand new, and this should not damage your camera at all...the actual voltage in use will quickly drop to 4.5. I suspect that some of the reason for the extra .2 volts may have been due to the fact that the batteries had been heated up quite a bit just a few minutes earlier in the soldering process.
That's it...you're done! From now on, you can easily disassemble this particular battery shell over the years and easily replace the batteries inside in a matter of minutes. A newly reconstituted battery of this type should easily power a camera for a year, unless you do unusually heavy shooting with your favourite 110 camera.
© 3 February 2003, by D. Scott Young - all rights reserved