Alinco EBP20N Battery Pack Re-cell.
By Brian Perrett, MW0GKX.
WARNING: This re-cell was done using standard batteries, soldering direct to them. To do the job safely you should use tagged cells, which are made for soldering.
This re-cell is similar to the Uniden Scanner Battery Pack Re-cell but the pack was sealed using sonic welding rather than clipped and glued as the Uniden pack was.
There was some talk at the Radio Club about sending a battery pack off to be re-celled, the costs involved, turn-around time etc. The pack concerned was attached to a pre-owned handy that, once charged, didn't hold the charge for very long. I mentioned that I had re-celled packs for different radios before and offered to do it for the cost of the cells. My offer was taken up and I was soon in posession of the offending pack.
As I mentioned at the start, the pack had been sonic welded along the seam in production so the first thing to do was to get it open. A couple of hours in the freezer and some sharp taps around the seam soon had some splitting along the seam, which I then used a fairly large flat bladed screwdriver to ease the split all the way around. I soon had the pack in two halves and ready to work on. Why the time in the freezer? Well the cold plastic will fracture at the weakest point when hit and the weakest point is... You guessed it, the seam.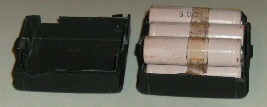 Be careful though because if the pack has suffered damage (from a drop, perhaps) then you could find the corners (they always seem to land on the corners when dropped) will break off first so, tap the seam toward the centre of the pack, away from the corners first. You can tell where the seam was on this pack by looking at the picture on the right.
Once opened I found that the cells were AA sized cells, as was believed from info found on the internet where a site in he US was offering "battery inserts" for these packs. A quick check around the internet turned up tagged AA sized cells for £3.00+ each while a national electronics retailer (with 2 local branches) had a special offer of an 8 pack of 2500mAh cells for, it worked out at, just under £2.00 each for the 6 required cells (I'll not charge for the other 2 cells and use them elsewhere if this option is taken).
A quick phone call to the owner confirmed that they were happy with the price and capacity of the cells and, after a short visit to the nearest branch (on-line stock availability is a wonderful tool!), I was ready to start rebuilding the pack. I carefully removed the safety device (usually it is a self-resetting thermal fuse) that was in among the cells and set 3 of the required 6 cells "top to tail" and taped them together to stop them from moving around while I prepped and soldered them.
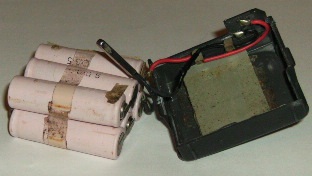
I prepped the pips and bases of the new cells with a file (a good scratching always helps the solder take) and with a very hot iron I tinned the ends of the cells and soldered them in series, using short pieces of wire, as per half of the original pack. I repeated this with the other 3 cells, copying the 2nd half of the pack. I then stacked 1 set of 3 cells on top of the other three and used a bit more tape to hold then aligned while I soldered the link between the 2 sets of 3 and the lead out wires on the ends of the pack. The safety device was placed and connected as it was in the original stack to ensure continued protection.
If you do this with non-tagged cells, as I have, use as hot an iron as you can and be very quick with the heat on the cell. Leave the cell to cool between tinning or soldering each end.
Overheated cells can explode!
A quick check with the volt meter, and another under load, showed that the new cells were connected to the correct pads to supply power to the radio (correct polarity is sooo important!) and holding up under load. I then reseated the new cells inside the old shell (some "easing" of the plastic was required) they were originally held in with some double sided tape, which I replaced with a fresh piece, and it was time to refit the other shell half (with a bit more "easing").
What is "easing"? Well you test fit the calls and see if there is anything stopping them sliding in or, once in, if the pack edges are being pushed out of line (cells do vary in their dimensions plus the solder and wire links will add a little bit). You make a note of where the fit is not right and, using a piece of sandpaper or similar, remove some of the offending high spots on the plastic, solder or whatever is causing the problem. This can take a little while to do as a good fit is better, especially when doing this for someone else, and you don't want to remove too much. Sand a bit, re-try, sand a bit more etc.
Once I was happy with the fit I used some "super glue" to join the seam. There were 2 reasons for me using that:
1: It is fairly easy to break apart should a re-cell be required again in later life and, more importantly,
2: I had some to hand on the bench!
All that was left was a replacement label denoting the new capacity. This is a pleasing finishing touch that reminds the owner of the capacity and also informative to any new owner in the future.
![]()
The old cells have gone into a (plastic) bin with all my other dead batteries to go to be recycled later, see the link on the right about the recycling of batteries, why, where etc.
Replacement EBP20N packs are available in the US for around $60 plus postage (depends on supplier), and are still only 600 mAh (although there are suppliers that have higher capacity packs available as well). Some US suppliers will not send batteries overseas but, if you can get one to send you a pack, there is still the chance of VAT and import duty being charged on your "import".
This re-cell has given the old casing a new lease of life along with an increase to the useage time (though it will take longer to charge too) for around £10.00, a bit of time and some solder. A bargain in my book!